The story of bread began over 30,000 years ago, but it was around 10,000 BC that bread baking as we know it started to take shape. This coincides with the dawn of agriculture during the Neolithic era when humans began to settle and farm rather than live a nomadic lifestyle. The earliest breads were likely flatbreads, made from a simple mixture of ground grains and water, cooked on hot stones or in the ashes of a fire.
As civilizations evolved, so did bread. The ancient Egyptians, around 3000 BC, are credited with the discovery of natural fermentation. They noticed that when the dough was left out, it would rise and become light and airy once baked – a process we now understand as yeast fermentation. This progress was a revolutionary development in bread making, leading to the fluffy, leavened bread we are familiar with today.
Throughout history, bread has played a vital role in human society. It was a staple food in the diet of many cultures, symbolizing sustenance and life. In medieval Europe, for example, it accounted for a significant part of the daily diet across all classes of society. The type of bread one ate was also a symbol of social status: white bread for the rich and dark, coarse bread for the poor.
The Therapeutic and Rewarding Aspects of Baking Bread at Home
Baking bread at home is more than just a culinary task; it’s an immersive experience that engages all the senses. The process of bread baking is therapeutic for many, offering a respite from the fast-paced, digital world. Kneading dough provides a physical connection to the food, a grounding experience that can be both meditative and satisfying.
The slow and deliberate process of bread-making encourages patience and mindfulness. Watching yeast breathe life into a mixture of simple ingredients is almost magical. It’s a practice that requires attention to detail – from measuring ingredients accurately to observing the subtle changes in the dough’s texture and size.
There’s also a deep sense of accomplishment in baking bread. Transforming flour, water, and yeast into a warm, fragrant loaf is a rewarding experience. It’s a blend of art and science, where precise measurements meet creative flair. Each loaf is unique, telling its own story through its crust, crumb, and flavor.
Moreover, homebread baking allows for a deeper understanding and appreciation of what we eat. It encourages bakers to think about the origin of their ingredients and the nutritional value of their creations. Baking your own bread can be a healthier alternative to store-bought varieties, often laden with preservatives and artificial additives.
In today’s world, where convenience often trumps quality, bread baking at home is a return to basics, a celebration of simplicity and tradition. It connects us to our past, to the very essence of human sustenance, and brings a sense of joy and fulfillment that is hard to find in other pursuits.
In This Article
Understanding the Basics
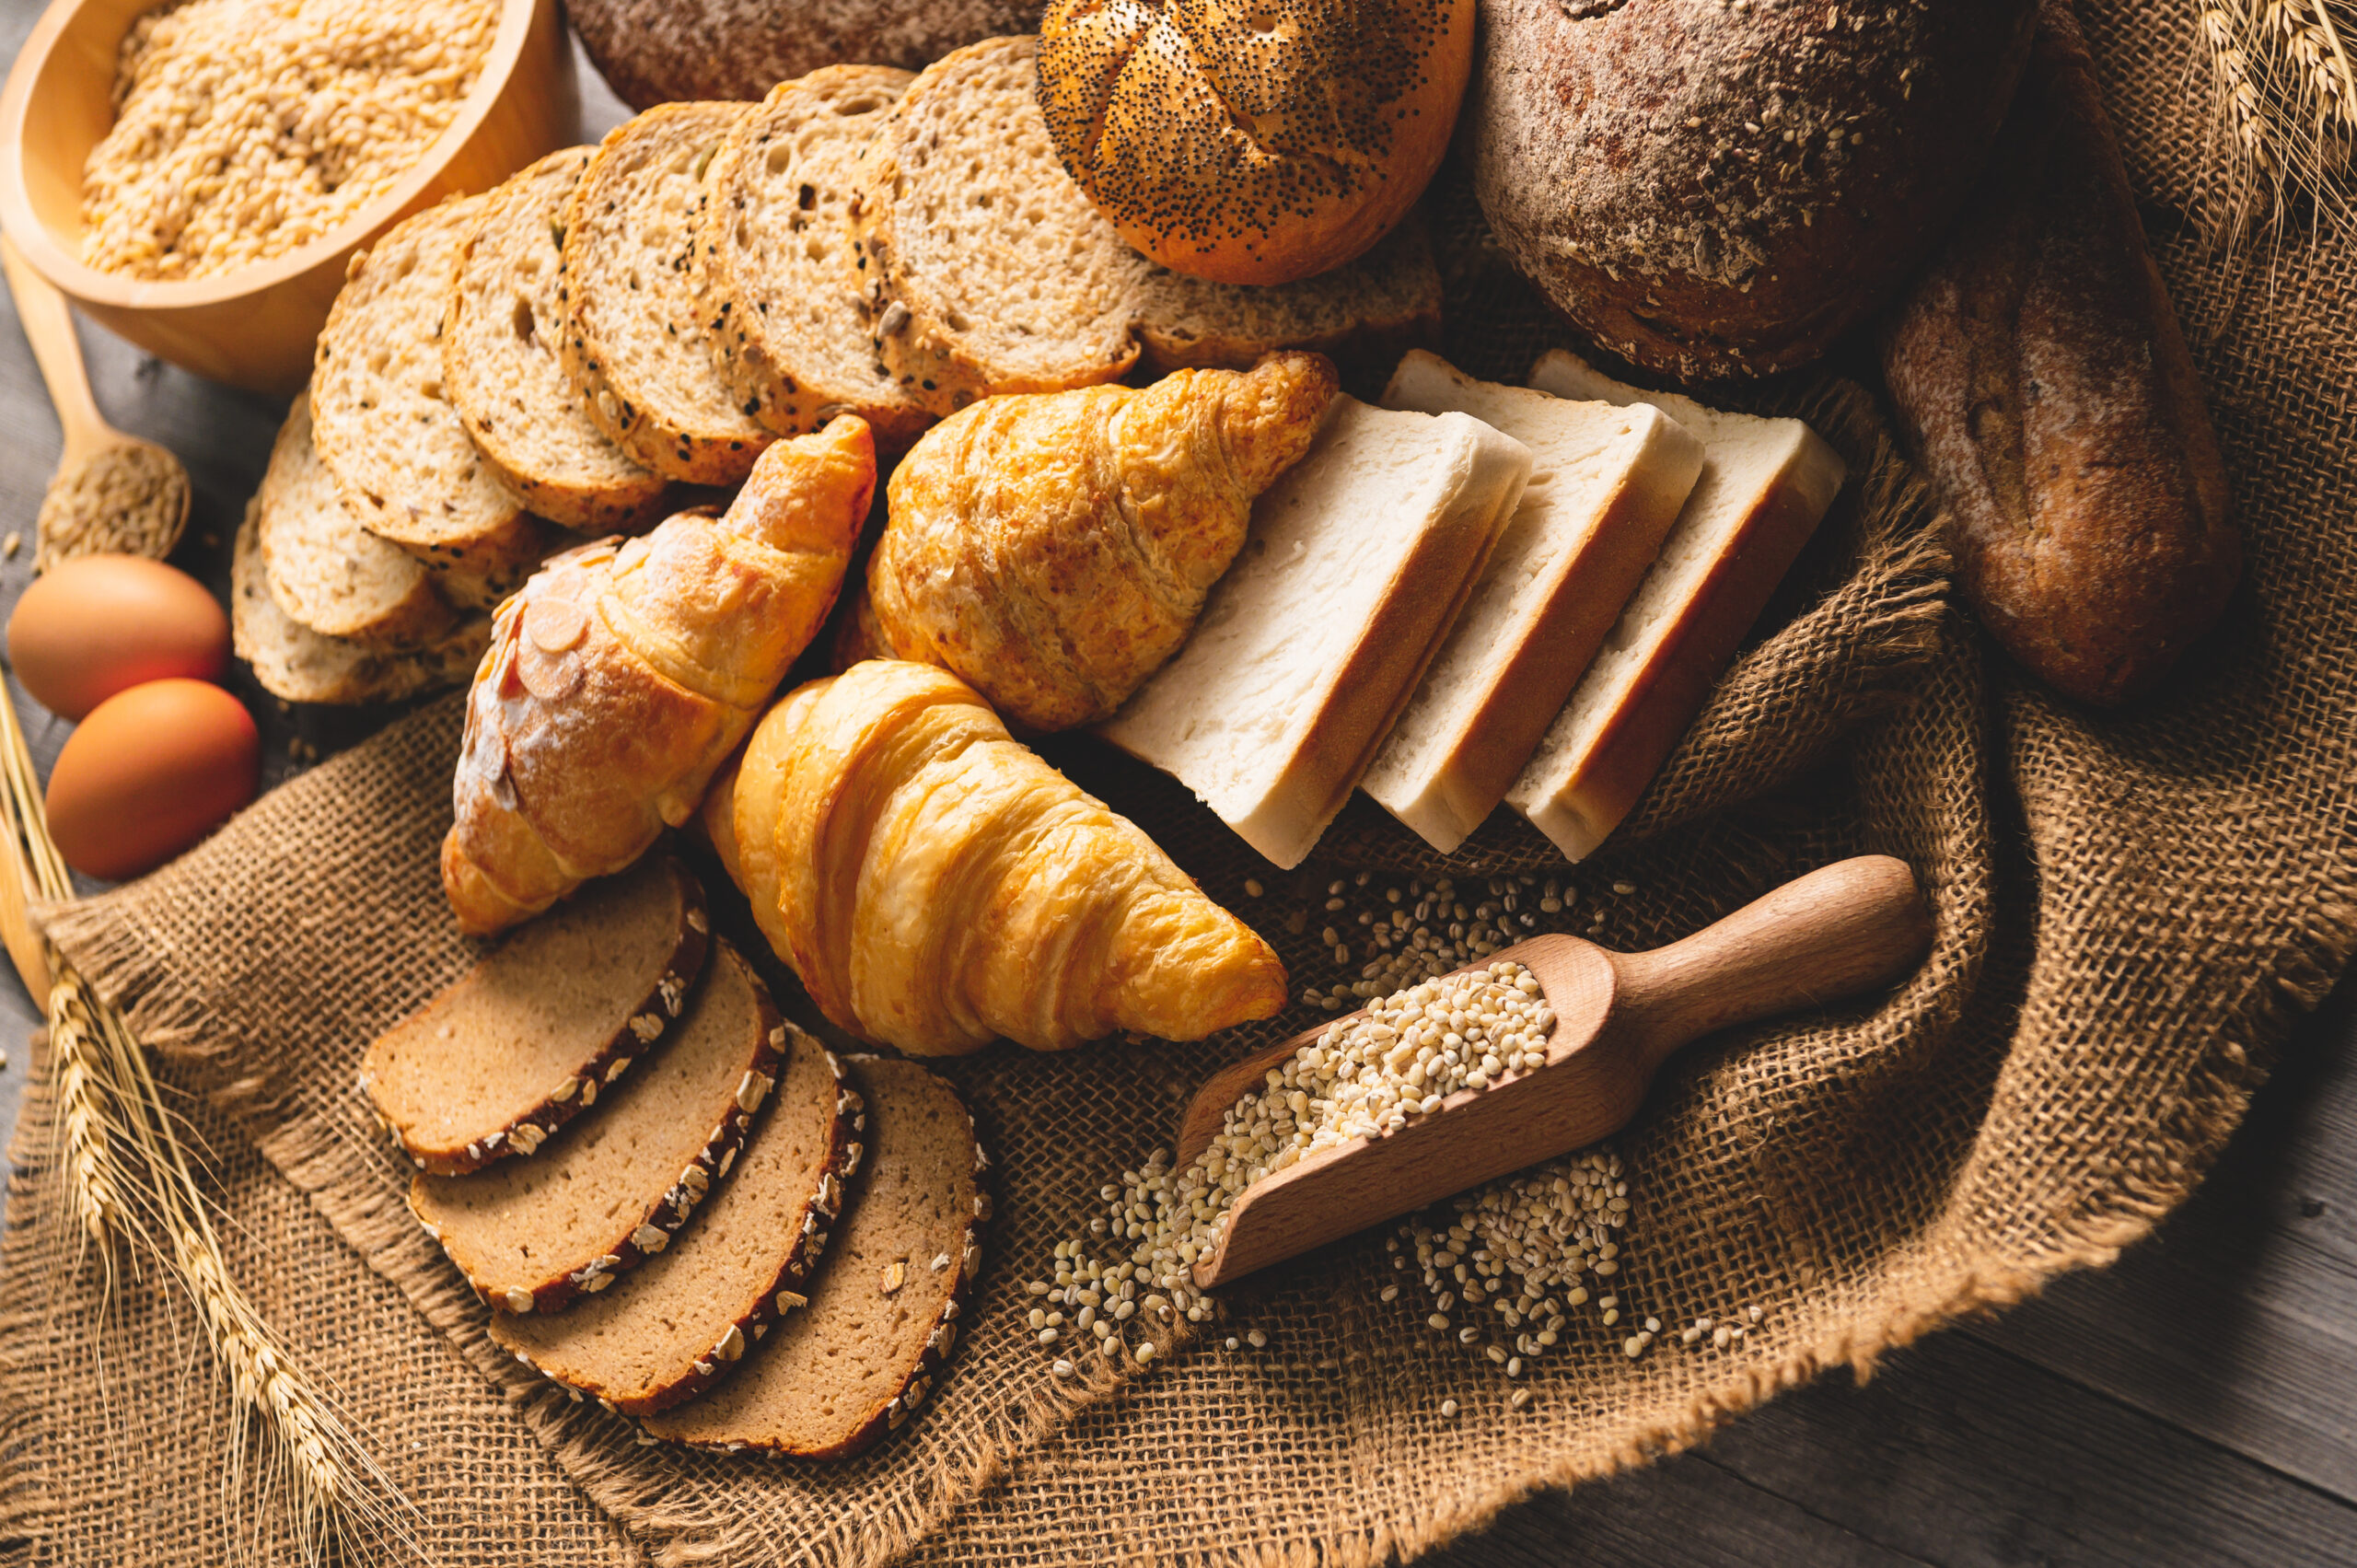
Different Types
1. White Bread:
- Characteristics: Soft texture, mild flavor, and light color.
- Ingredients: Typically made with refined white flour (bran and germ removed, resulting in a lighter loaf).
- Popular Variants: Sandwich, French baguette, Italian ciabatta.
2. Wheat Bread:
- Characteristics: Denser texture, nuttier flavor, and darker color compared to white bread.
- Ingredients: Made with whole wheat flour – includes the bran and germ of the wheat kernel.
- Health Benefits: Higher in fiber and nutrients than white bread.
3. Sourdough Bread:
- Characteristics: Distinct tangy flavor, chewy texture, and crispy crust.
- Ingredients: Made with a fermented mixture of flour and water (sourdough starter), which acts as a natural leavening agent.
- Unique Aspect: The flavor and texture of sourdough vary based on the fermentation time and the environment.
4. Other Varieties:
- Rye: Made with rye flour, known for its hearty flavor.
- Multigrain: Includes a variety of grains and seeds, offering a complex texture and rich flavor.
- Specialty: Gluten-free, low-carb, and other health-focused variants.
Key Ingredients
1. Flour:
- Types: All-purpose, flour, whole wheat, rye, and others.
- Role: The base of the bread, providing structure and flavor.
2. Water:
- Importance: Activates the yeast and hydrates the flour to form the dough.
- Temperature: Warm water is ideal for activating yeast, but temperatures vary for different bread types.
3. Yeast:
- Types: Active dry yeast, instant yeast, and fresh yeast.
- Function: A living organism that ferments, producing carbon dioxide that causes the dough to rise.
4. Salt:
- Purpose: Enhances flavor and controls yeast fermentation.
- Variety: Table salt, sea salt, or kosher salt can be used.
Essential Tools
1. Mixing Bowls:
- Usage: For mixing and resting the dough.
- Materials: Can be glass, stainless steel, or plastic.
2. Dutch Oven:
- Purpose: Ideal for baking bread with a crispy crust and soft interior.
- Alternative: Heavy-lidded pot that can withstand high temperatures.
3. Baking Stone:
- Usage: Emulates a professional oven, providing even heat distribution.
- Benefit: Excellent for crispy crusts, especially for pizzas and flatbreads.
4. Thermometer:
- Types: Instant-read and oven thermometers.
- Importance: Ensures the correct temperature for proofing yeast and baking bread.
5. Additional Tools:
- Bread Knife: For clean slicing.
- Bench Scraper: For handling and dividing dough.
- Pastry Brush: For applying washes or butter.
- Proofing Basket (Banneton): For shaping and proofing artisan bread.
Understanding the basics lays a solid foundation for anyone embarking on their bread-baking journey. Each different type offers a unique experience in taste and texture, while the key ingredients and tools help ensure successful baking outcomes. As we progress, we will carry you deeper into each aspect, demystifying the art of bread making.
The Process of Baking Bread
Bread baking is both an art and a science. Understanding the steps and the reasons behind them will help you create delicious, homemade bread. Let’s explore each step in detail:
Step-by-Step Guide
1. Mixing Ingredients:
- Objective: Combine flour, water, yeast, and salt to form the dough.
- Technique: Start by mixing the dry ingredients, then gradually add water. For enriched breads, ingredients like sugar, fats, and eggs are also included at this stage.
- Consistency: The goal is a homogenous mixture where all ingredients are evenly distributed.
2. Kneading the Dough:
- Purpose: Develop gluten, which gives bread its structure and elasticity.
- Methods: Can be done by hand or with a stand mixer using a dough hook.
- Indicator: The dough should be smooth, elastic, and slightly tacky to the touch. This process usually takes about 10-15 minutes by hand.
3. First Rise (Bulk Fermentation):
- Process: The dough is left to rest, allowing the yeast to ferment & the dough to rise.
- Duration: Typically 1-2 hours, but this can vary based on the recipe and ambient temperature.
- Visual Cues: The dough should double in size and feel airy.
4. Shaping the Dough:
- Goal: Form the dough into a desired shape before the final rise.
- Techniques: Varies based on type– loaves, rounds, baguettes, etc.
- Care: Handle the dough gently to avoid deflating it.
5. Second Rise (Proofing):
- Purpose: Allows the shaped dough to rise and develop flavor.
- Duration: Generally shorter than the first rise, often around 30-45 minutes.
- Readiness Test: Gently press a finger into the dough; if it springs back slowly, it’s ready to bake.
6. Scoring and Baking:
- Scoring: Make shallow cuts on the surface of the dough with a sharp blade. This particular cut controls how the bread expands in the oven.
- Baking: Preheat your oven to the suggested temperature setting for your recipe. (Baking times and baking temperatures may vary depending on the type.)
- Steam: Some recipes benefit from steam during the initial baking phase, which helps in crust development.
Timing and Temperature Control
- Temperature: The ideal temperature for yeast activity is given between 75°F and 78°F (24°C to 26°C). Dough that is too cold will rise slowly, while too-warm dough can lead to over-fermentation.
- Oven Preheating: Essential for consistent baking results. The oven should be preheated for at least 15-20 minutes beyond the time it reaches the baking temperature.
- Baking Temperature: Varies by bread type. For example, lean doughs like baguettes require a hotter oven (around 450°F or 232°C), while richer doughs like brioche bake at lower temperatures (around 350°F or 177°C).
Understanding and mastering these steps is critical. Each phase contributes to the texture, flavor, and appearance of the final product. Remember, practice and patience are key – each batch of bread is a learning experience.
Your First Recipe – Classic White Bread
This recipe for classic white bread is perfect for beginners. It yields a soft and fluffy loaf with a golden crust, ideal for sandwiches or enjoyed with butter.
Ingredients:
- Flour: 3 ½ cups (about 420 grams)
- Warm Water: 1 ¼ cups (about 300 ml) – approximately 110°F (43°C)
- Granulated Sugar: 2 tablespoons (about 25 grams)
- Salt: 1 ½ teaspoons (about 7 grams)
- Instant Yeast: 2 ¼ teaspoons (one packet, about 7 grams)
- Unsalted Butter, softened: 3 tablespoons (about 42 grams)
Equipment:
- Large mixing bowl
- Dough scraper
- Loaf pan (9×5 inch)
- Kitchen towel or plastic wrap
- Oven
Step-by-Step Instructions:
1. Prepare the Yeast Mixture:
- In a small bowl, dissolve one tablespoon of sugar in the warm water. Sprinkle the yeast over the top and let it sit until it becomes foamy (5-10 minutes). This foaming will indicate that the yeast is active.
2. Mix the Dough:
- Prepare a large bowl to mix the flour, remaining sugar, and salt.
- Add the yeast mixture and softened butter to the dry ingredients.
- Stir everything fully until a rough dough forms.
3. Knead the Dough:
- Lightly flour a working surface and scoop the dough onto it.
- Knead the dough until it’s smooth & elastic (approximately 10 minutes.).
- Add a small bit of the flour if the dough becomes too sticky.
- The dough should be slightly tacky – not sticky.
4. First Rise:
- Put the prepared dough into a lightly oiled bowl, turning it to coat all sides.
- Fully cover the bowl with a kitchen towel or piece of plastic wrap.
- Select a warm spot and wait for the prepared dough to rise till it has doubled in size (1 to 1.5 hours).
5. Shape the Loaf:
- Gently deflate the dough. Then, turn it out onto a lightly floured surface.
- Shape it into a rectangle roughly the length of your loaf pan.
- Roll the fresh dough into a tight cylinder & pinch the seams closed.
- Place the dough, seam side down, in the greased loaf pan.
6. Second Rise:
- Cover the loaf pan with a towel. Please wait for the dough to rise for 30 to 45 minutes or until it crests above the rim of the pan.
7. Preheat the Oven:
- Preheat the oven @ 375°F (190°C).
8. Bake the Bread:
- Bake the prepared bread in the preheated oven till it’s golden brown. It should also sound hollow when tapped (30-35 minutes).
- If it browns too quickly, loosely tent it with aluminum foil.
9. Cool the Bread:
- Transfer the bread from the oven; wait for it to cool in the pan (10 min.).
- Then, transfer it to a wire rack to fully cool before slicing.
Enjoy your homemade classic white bread! It’s perfect for sandwiches or toasted with butter and jam. Remember, bread baking is as much about the process as it is about the result. Each time you bake, you’ll learn more about how the dough feels and how small changes can affect the final loaf. Happy baking!
Tips for Success
Mastering bread baking requires understanding certain key concepts and techniques. Here, we’ll focus on hydration ratios, kneading techniques, and recognizing when the dough is ready, all crucial for achieving the perfect loaf.
Hydration Ratios
1. Understanding Hydration:
- Definition: The hydration ratio in bread baking refers to the amount of water relative to the amount of flour, expressed as a percentage.
- Formula: Hydration (%) = (Weight of Water / Weight of Flour) × 100
- Impact: Hydration affects the dough’s consistency, handling, and the final texture of the bread.
2. Common Hydration Levels:
- Low Hydration (50-60%): Results in denser bread, like many traditional bagels.
- Medium Hydration (60-75%): Ideal for most basic bread recipes, including the classic white bread.
- High Hydration (75-85%): Used for artisan breads like ciabatta, resulting in a more open crumb and chewy texture.
Kneading Techniques
1. Purpose of Kneading:
- Develops gluten strands, giving the bread structure and elasticity.
- Ensures even distribution of ingredients and air pockets.
2. Methods of Kneading:
- By Hand: Push the dough forward with the heel of your hand, fold it over itself, and turn. Continue this process until the dough has become smooth and elastic.
- Using a Stand Mixer: A dough hook attachment can be used to knead the dough. This method is more consistent and less labor-intensive.
3. How to Know When Kneading is Sufficient:
- Windowpane Test: Start by stretching a small piece of dough between your fingers. The Result: If it can stretch to form a thin membrane without tearing, then the gluten is well-developed.
Recognizing When the Dough is Ready
1. First Rise (Bulk Fermentation):
- Visual Clue: The dough should double in size.
- Timing: Generally takes 1-2 hours but can vary based on the recipe and room temperature.
2. Second Rise (Proofing):
- Poke Test: Gently press a finger into the dough. If the indentation slowly springs back but still leaves a noticeable impression, the dough is ready to bake.
- Over-proofed Dough: If the dough collapses or doesn’t spring back, it’s over-proofed. This event means the gas bubbles have exhausted themselves, leading to dense bread.
3. Final Check Before Baking:
- Consistency: The dough should be puffy and airy, indicating that the yeast has done its work.
Incorporating these tips into your bread-baking routine will significantly enhance the quality of your bread. Remember, each batch of dough can behave differently based on a variety of factors like flour type, ambient temperature, and humidity. Therefore, learning to adapt and trusting your senses are as important as following the recipe.
Common Troubleshooting
Bread baking can sometimes be challenging, especially for beginners. Knowing how to fix common problems is essential for being an expert baker. Here, we address three common problems: dough consistency, rising issues, and crust texture.
Dough Too Sticky or Too Dry
1. Too Sticky:
- Causes: High hydration, insufficient flour, or over-proofing.
- Solutions:
- Add Flour: Add a small amount of flour during kneading, but be cautious – do not add too much since it can make the bread dense.
- Correct Hydration: Double-check your recipe for the correct hydration ratio.
- Proper Kneading: Ensure the dough is kneaded sufficiently to develop the gluten.
2. Too Dry:
- Causes: Insufficient water, too much flour, or a dry environment.
- Solutions:
- Add Water: Incorporate small amounts of water until the desired consistency is achieved.
- Measure Accurately: Use precise measurements for both flour and water.
- Humidity Control: In dry climates, cover the dough during rising to prevent it from drying out.
Bread Not Rising
1. Yeast Issues:
- Expired Yeast: Check the expiration date. Old yeast may lose its potency.
- Improper Activation: Ensure that the water temperature is not too hot or too cold to activate the yeast.
2. Environmental Factors:
- Temperature: Yeast thrives in a warm environment. A cold kitchen can slow down the rising process.
- Solutions: Find a warmer spot or create a makeshift proofing box in your oven with just the light on.
3. Kneading Technique:
- Under-kneaded Dough: Can result in poor gluten development, affecting the rise.
- Solution: Knead until the dough passes the windowpane test.
Crust Too Hard or Too Soft
1. Too Hard:
- Oven Temperature: If the oven is too high, the crust can become overly hard.
- Baking Time: Over-baking can also lead to a hard crust.
- Solutions: Use an oven thermometer to check accuracy and adhere to recommended baking times.
2. Too Soft:
- Steam and Moisture: Lack of sufficient steam can result in a softer crust.
- Oven Temperature: A temperature that’s too low may not adequately bake the crust.
- Solutions:
- Introduce Steam: Use a pan of water in the oven to create steam.
- Increase Oven Temperature: Ensure your oven reaches the correct baking temperature.
Remember, bread baking is a skill honed over time, and encountering these issues is part of the learning process. Each challenge offers an opportunity to understand and refine your baking techniques. Keep experimenting, and with each loaf, you’ll grow more confident in your bread-baking abilities.
Conclusion and What’s Next
Encouragement for Practice and Patience
As we wrap up this beginner’s guide to bread baking, remember that practice is key to mastering this art. Bread baking is not just about following a recipe; it’s a journey of sensory exploration and learning. Each loaf you bake will teach you something new about the process, the ingredients, and your own preferences.
Patience is a vital ingredient in bread baking. From waiting for the dough to rise to allowing the bread to cool properly, each step requires a measure of patience. This patience is often rewarded with the delightful aroma of fresh bread and the satisfaction of creating something wholesome and delicious from simple ingredients.
Preview of the Next Topic: “Exploring Sourdough”
In our next installment, we will dive into the world of sourdough – a bread with a rich history and a unique character. Sourdough is known for its tangy flavor, chewy texture, and crisp crust, which are the results of natural fermentation.
We’ll explore:
- Creating a Sourdough Starter: The heart of sourdough baking, a living culture of flour and water.
- Maintaining Your Starter: How to feed and care for it to keep it healthy and active.
- Sourdough Techniques: From mixing to fermentation, shaping, and baking.
Sourdough baking is a fascinating and rewarding experience, offering a better understanding of the natural processes behind bread making. It’s a perfect next step in your bread-baking journey.